Fio Queue Depth Tuning
Terms related to simplyblock
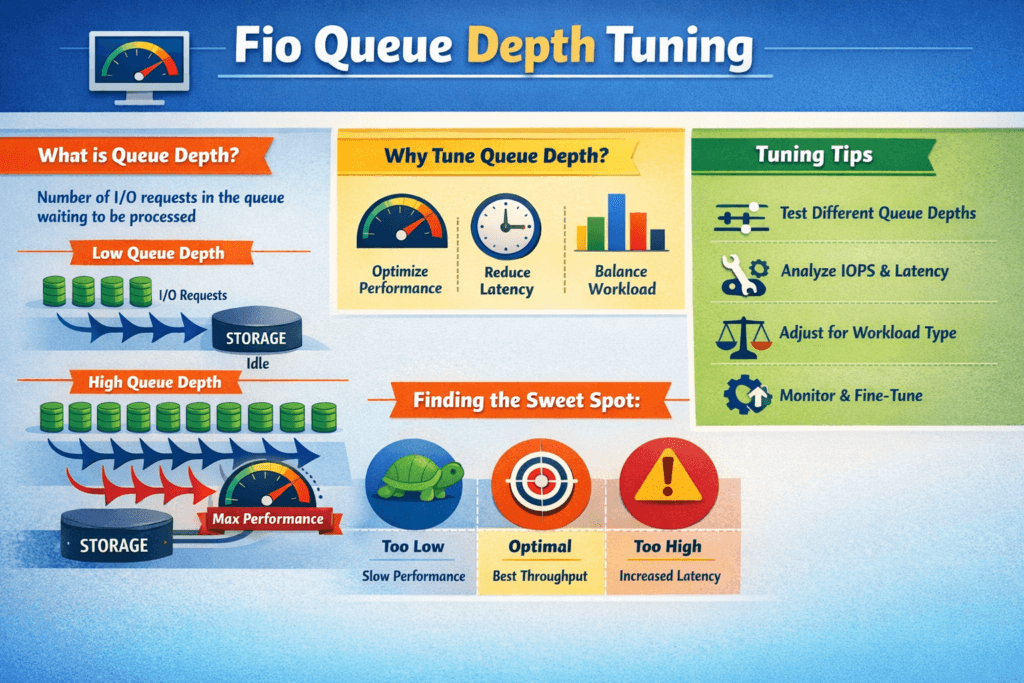
Fio Queue Depth Tuning means you set how many I/O requests fio keeps in flight, then you measure how that choice shifts IOPS, throughput, and latency. In fio, iodepth drives outstanding I/O per job, and numjobs adds parallel workers. Together, they shape the queue in the Linux block layer, the NVMe driver, the network path, and the storage backend.
Most teams look for a “knee” in the curve. Up to that point, added depth lifts throughput with a small latency cost. Past that point, extra depth mainly adds wait time, pushes p99 higher, and burns CPU. That risk grows when the data path crosses Kubernetes Storage, NVMe/TCP, and Software-defined Block Storage, because each layer can add its own queue.
How to set queue depth for real systems
Start with a single workload pattern, and hold it steady. Keep block size, read/write mix, access pattern, and test length constant. Then sweep depth in steps and watch both throughput and tail latency.
Align the test with business goals. If you run OLTP or logs, you often want low p99 more than max IOPS. If you run a batch, you may accept higher latency for more bandwidth. Depth tuning works best when you tie it to an SLO and enforce it across teams.
Small discipline changes also improve trust in the numbers. Pin the benchmark to the same CPU and NUMA layout each time. Keep background load out of the nodes. Log CPU, IRQ, and network counters during every run.
🚀 Standardize High-Performance Storage for Kubernetes
Use Simplyblock to run NVMe/TCP-backed volumes with clear isolation and consistent results across clusters.
👉 Use Simplyblock for Kubernetes Storage →
Fio Queue Depth Tuning in Kubernetes Storage
In Kubernetes Storage, fio rarely hits a raw disk. It hits a Persistent Volume path that includes CSI behavior, kubelet scheduling, and backend policy. Queue depth can stack up inside the pod, on the node, in the network, and in the storage pool.
Match production settings before you tune. Use the same StorageClass rules you ship with, including replica or erasure coding settings, volume type, and mount mode. Schedule the FIO pod on the same node pool your stateful apps use, and isolate it from noisy workloads. When you change the storage policy mid-test, you change the system, not just the queue.
Architecture changes the result, too. Hyper-converged storage can cut hops, but it shares CPU with apps. Disaggregated storage adds a network hop, yet it often improves isolation and scaling. Your “right” depth depends on where the system queues first.
Fio Queue Depth Tuning and NVMe/TCP
NVMe/TCP adds transport cost and transport queueing. TCP also competes for CPU, which can cap scaling earlier than local NVMe. Depth can still lift throughput, but it may raise tail latency sooner once the host hits CPU or NIC limits.
Treat NVMe/TCP as a SAN alternative on Ethernet. It fits bare-metal clusters where you want fast block storage without Fibre Channel gear. For many fleets, it also gives a clean path to NVMe-oF designs, because you can keep the NVMe command set end-to-end while you scale out.
Network hygiene matters. Keep MTU consistent, tune IRQ placement, and avoid mixed traffic on the same links during tests. That effort often moves the knee to the right without raising p99.
Measuring Fio Queue Depth Tuning Results
A useful benchmark answers one narrow question: “Which depth meets my latency target at the needed throughput?” Build that answer with repeatable runs and clear reporting.
Use these steps to keep results stable and easy to compare:
- Run time-based tests with a ramp period, and report only steady-state windows.
- Track p50, p95, and p99 latency, plus IOPS over time, not just an average.
- Sweep one variable at a time, such as depth first, then job count.
- Capture CPU use, IRQ load, and network stats at each step.
When you present results, show depth on the x-axis, IOPS or bandwidth on the left y-axis, and p99 latency on the right y-axis. That single view makes saturation and queue buildup obvious.
Levers that improve throughput and latency
Queue depth tuning works after you remove bottlenecks. Start with CPU efficiency. A high-overhead I/O stack forces you to push depth higher just to hit throughput, and that often harms tail latency. User-space, zero-copy data paths can cut per-I/O cost and reduce the depth needed to keep devices busy.
Next, control contention with clear limits. Multi-tenancy and QoS can cap the damage from one workload that runs aggressively. Finally, line up the storage backend with the workload. Random 4K patterns want fast media and clean parallelism. Large sequential I/O wants bandwidth and stable networking.
Queue Depth Outcomes by Workload and Transport
Queue depth often trades throughput for wait time. This table summarizes common patterns teams see across NVMe media and NVMe/TCP paths.
| Queue depth range | What you often see | Good fit | Typical downside |
|---|---|---|---|
| 1–4 | Lowest latency, modest IOPS | OLTP, logs, metadata | Leaves performance unused |
| 8–32 | Balanced IOPS and latency | Mixed fleets | Hides early congestion |
| 64–128 | Higher throughput, more jitter | Batch, analytics, backup | p99 climbs, CPU rises |
| 256+ | Stress-only numbers | Limit tests | Unstable, not realistic |
Simplyblock™ for steady queue behavior
Simplyblock focuses on Software-defined Block Storage with NVMe/TCP and NVMe/RoCEv2 support, so teams can keep the NVMe command path while they scale. The platform also builds on an SPDK-based user-space design, which can reduce context switches and cut CPU cost per I/O. That shift often lets teams reach a throughput target with less queue depth and tighter tail latency.
Kubernetes Storage teams can deploy simplyblock in hyper-converged, disaggregated, or hybrid modes. That flexibility matters when you want to validate queue depth settings across layouts without swapping storage stacks. Multi-tenancy and QoS also help keep one benchmark job from pushing other namespaces into latency spikes.
What comes next for queue-depth control
Many teams now move from manual sweeps to policy-driven control. They set a p99 target, then tune depth and job count to match it under load. Over time, systems will adjust concurrency in near real time based on latency, CPU headroom, and network pressure.
Hardware offload also changes the game. SmartNICs, DPUs, and IPUs can handle parts of the data path, which frees the CPU and reduces jitter. As more shops adopt these options, queue depth tuning will shift from “max IOPS” toward “meet SLO with the smallest queue.”
Related Terms
Teams often review these glossary pages alongside Fio Queue Depth Tuning.
Questions and Answers
In fio, queue depth (iodepth) increases outstanding I/O, but performance gains only matter if the device is still underutilized. The moment throughput flattens and p95/p99 latency accelerates, you’re mostly adding queueing delay. Keep block size and RW mix fixed, sweep iodepth in small steps, and stop at the latency knee. This is the core workflow behind fio queue depth tuning for NVMe.
iodepth controls outstanding I/O per job, while numjobs controlling how many independent submitters you have. Increasing iodepth the block queue and device parallelism; increasing numjobs also stresses CPU scheduling and lock contention. A common tuning pattern is moderate iodepth (to avoid tail spikes) and scaling numjobs until CPU or storage saturates. Validate with p99, not just throughput.
Buffered I/O, too-small datasets that fit in cache, and short runtimes can produce inflated numbers. For device-level queue depth tuning, use direct I/O, a dataset larger than RAM, and a runtime long enough to reach steady state. Also, avoid changing multiple variables at once; if you change block size, RW mix, and iodepth together, you won’t know what caused the difference. The baseline reference is a consistent FIO storage benchmark profile.
For latency-sensitive apps, pick the lowest queue depth that meets your IOPS target, because deeper queues often increase tail latency disproportionately. If you’re chasing p99, accept a small throughput trade for stability. Compare depth changes against NVMe latency and stop when p99 grows faster than IOPS improves, especially for sync writes and mixed read/write workloads.
You can hit CPU limits (submission/completions, interrupts/softirq), device internal parallelism limits, or contention in the I/O stack. Once any layer saturates, extra outstanding I/O just forms longer queues, so latency rises and throughput plateaus. If scaling ends “too early,” test whether the bottleneck is CPU by pinning fio threads, watching softirq, and repeating with more numjobs at a lower iodepth level to compare behavior.